One of the methods used to stream and timeslip services is by using Fujitsu decoders and GrassValley Summit K2s. In its most basic form, live video is encoded by Fujitsu encoders from Broadcast, sent over the Internet, and then decoded by Fujitsu decoders located in the campus video rack. In the most basic terms, the flow works something like this:
At the campus level, the decoder is monitored Centrally; however, the status can be checked by viewing the front panel. If the status screen isn’t showing, ensure the power button is on and that the rack is connected to the Internet.

Finally, to pause live video (timeslip) we use the GrassValley Summit K2 (K2). All devices have two cards that can be used for recording and playing back video simultaneously. In addition, it has many other features, such as storing several days worth of production-quality video, setting in/out points for videos, and splicing other videos together to create playlists.

¶ Using the K2
¶ Login
We connect to the K2 by using Microsoft Remote Desktop Connection (RDC) Application. The server and connection information can be found in the Campus Support Document. After connection, AppCenter should open; however, if it does not it can be opened from the Desktop.
If there are problems connecting via RDC, see the Remote Desktop Connection problems and solutions page.
¶ Overview of the AppCenter Interface
The AppCenter interface is laid out in the following order.
- Card 1 and Card 2, which has separate transport controls (Play / Stop / RW / FF).
- Card 1 is used for recording.
- Card 2 is used for playback.
- Video bin with bin selection.
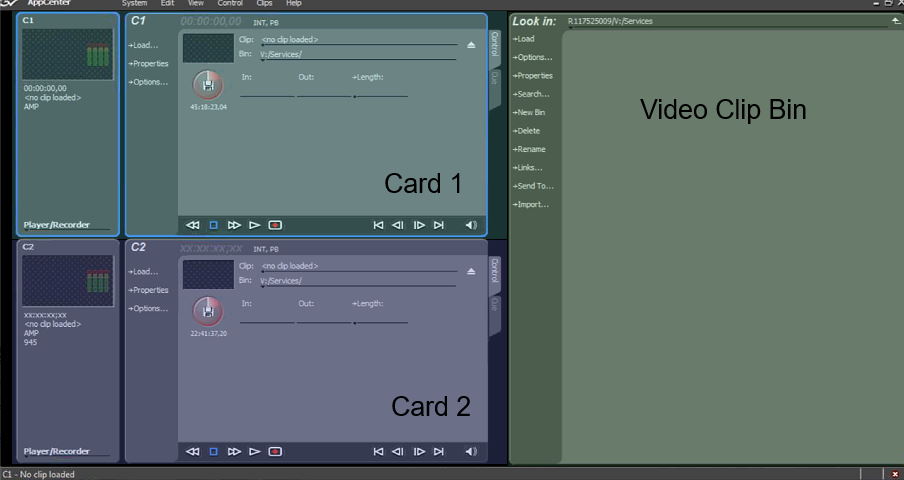
After videos start recording on Card 1, they can be moved to Card 2 transport and played back.
¶ Changing the Clip Bin
The clip bin is similar to a folder, which allows video clips to be organized on the K2. To change folders, click the “Look in:” bin name, which will provide a drop down menu with the bins on the K2.
To change where videos are recorded to, change the bin field in Card 1.
¶ Selecting a Card
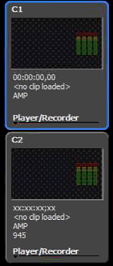
Since the K2 has two cards that have playback and recording capabilities, it is good to know which card will be controlled with hotkeys. While in the AppCenter, the card that is last clicked on will show a blue border around it, indicating that it is the one currently selected. A red border means that the card is currently recording, while a green one means that the card is playing. The thicker border will indicate which one is selected.
¶ Shutdown and Restarting AppCenter
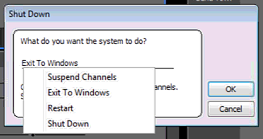
Clicking on the AppCenter close button will popup a dialog asking the user what to do, the most common option to be shutting down the computer.
¶ Importing Videos
Videos can be imported to the K2 to play back by copying the videos to a USB drive or via a network share, if the K2 is set up to do so. There are only a small subset of video formats, or codecs[1], that are allowed to be imported.
¶ Step 1: Copying the Video to your K2
Never copy files or videos to the C: drive! Doing so can cause the K2 to stop responding and will then need on-site repair.
- USB Drive: Copy the video files from the import media (USB or network share) to the proxy folder on your V: or G: drive on the K2.
- Via Network: To copy files from your another computer to the K2, on your computer to go Finder, then in the menu bar select
Go > Connect to Server, and usesmb://10.xxx.60.52/proxy. Be sure to changexxxto your network campus code, which can be found in your Checklist. Use the K2 username and password.
¶ Step 2: Importing Videos
- To import the videos, drag them into the video bin from the
proxyfolder into the video bin in the AppCenter. - The video may take a few minutes to import. To check the status of the imports, view the “Transfer Monitor” in the App Center by going to System > Transfer Monitor. While the transfer is being imported, it will show up under the “Receiving” tab. Once it is completed, it will appear under “Completed” and show whether it was successful or not.
Always verify with Central before importing video files into the K2, as some codecs do not play as smoothly and could cause video glitches or failure.
¶ Recording and Video Playback
¶ Recording Video
To record videos, use Card 1 and eject any videos currently loaded by pressing the eject button. To begin recording, press the record button. This will start a new video recording called Clip and the thumbnail will appear in the video bin.
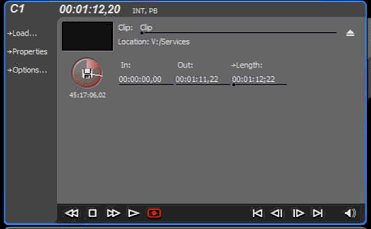
To change the name of the clip, right click on the clip in the video bin and select “Rename”, or, on the card, click on the clip name while it’s recording.
¶ Playing Video
As the video is recording, it can play the video on Card 2. Do this by drag and dropping the video from the video bin to anywhere on Card 2. The transport controls can control the video output.
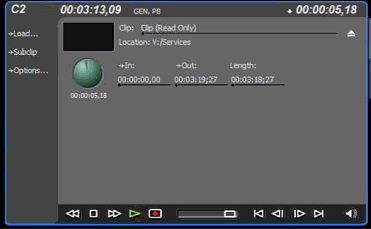
- Top left corner time indicates total clip length.
- Top right corner time indicates length remaining in playback.
A clip should always have at least 5 seconds of buffer (indicated in the top right corner). Attempting to play with less buffer will cause video drops in the output.
¶ Keyboard Controls
There are several keyboard shortcuts that can be used to control the video transport. The keyboard will control whichever card is currently selected. The most common that will be needed for a live event are:
Spacebar - Toggle Play/Stop command
← or → - Skip back or forward a single frame
Shift + → - Skip back or forward a second
¶ Deleting Videos
To delete videos, right click the clip in the video bin and select “Delete” and then confirm the dialog that appears. Next, depending on the configuration, the recycle bin may need to be emptied.
To empty the recycle bin, go to Clips > “Empty Recycle Bin”, and then confirm the dialog that appears.
Before a clip can be deleted it must not be included in any playlist that’s not also being deleted, or loaded into a card. If this is done, the K2 will display an unknown error message when trying to delete the clip.
¶ Trimming Videos
Videos can be trimmed using in and out points and can also be split apart by using subclips.
¶ Setting In/Out Points
To set video in and out points, load the video into the card and scrub to the point where the video should start or end and then click the “In” or “Out” buttons, respectively. Clicking on the time will allow fine-tuning or resetting the in/out points.

In and out points can only be set on clips that are not currently being recorded.
¶ Creating Subclips
To create a subclip, load the video into the card and click the Subclip button. The In/Out points will then flash, until they receive a value, which is accomplished the same way as setting an In/Out point.
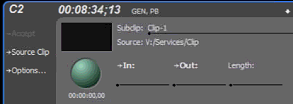
To complete the subclip, click “Accept” underneath the card name (“C2” in the example). Finally, to go back to the original clip, click “Source Clip”.
Oftentimes, users will only need to clip the beginning of a file. In that situation, set the In-point to be at that spot, and then scrub to the end of the file and set that to be the Out-point.
¶ Playlists
The K2 allows for clips to be built into a playlist, these can be useful for certain things, like playing two files right after the other. To build a playlist, switch the card to playlist mode by clicking “Player/Recorder” at the bottom of the card status monitor and selecting “Playlist”.

After switching to the playlist editor, begin dragging clips from the video bin into the editor, aligning them where they belong.

As soon as a clip is moved to an empty playlist, a playlist clip is created in the video bin. Once the playlist has been created, switch back to the Player/Recorder by selecting “Playlist” in the card status monitor.

¶ Advanced Features
¶ Media Consolidation
When a file has been subclipped and the original file is deleted, or an In/Out point set on an original file, the full original file still remains available on disk. To reclaim storage from those files, a clip can be consolidated which will remove any excess video. The process can be completed on the entire video library by going to “Clips” > “Consolidate Media”. To consolidate just one file, right click on the clip and select “Consolidate Media.”
¶ Exporting Videos
Videos can be exported to the disk for transferring off of the K2 by right clicking a clip in the video bin and selecting “Send To...”. In the following dialog, select “File” and find the location that the file should be saved to. Once found, ensure the file type is desired and select “Send.”
The default file type supported by the K2 produces a very large file with minimal quality loss. It is recommended to use the QuickTime Movie format if transferring to another non-K2 device or if quality loss does not matter.
¶ Troubleshooting
¶ Cannot Connect to K2 with Remote Desktop Connection
- Check that the K2 is on by checking for green status lights on the front. If it is not on, press the power button.
- After powering on the K2, it could take up to ten minutes before login is allowed.
- If it still does not connect, please contact Highlands Production Support.
¶ Video Resources
These are very short video support resources that quickly cover the topics referenced in this article.
- ConnectingHow to connect and login to the K2
- Importing VideosHow to import videos into the K2 using over the network
- Playback and RecordingBasics on how to record video clips and play them
- Trimming VideosSetting clip cue points
- PlaylistsHow to create a playlist from a set of clips
The K2 Summit supports DV, MPEG-2, and AVC-Intra, and AVCHD/H.264. Note that H.264 does not check for any errors, so any video encode issues will present themselves in a live environment. ↩︎
