The Haivision ConnectDVR / DisplayEngine (commonly referred to as the “DE”) system is an HLS streaming device with DVR/timeslip capabilities. It allows video streams to be downloaded or streamed and then played back via the device output.
On a typical setup, there are eight DVRs.
Portable campuses also have a secondary DE.
¶ Using the Device
¶ Web Interface
In nearly all instances, it is recommended to use the Stream Deck / Companion interface; however, it is important to understand how the device works, how to monitor it, and how to control it manually. To login to the web interface, use the login information given in the campus information document.
¶ Previewing
Once logged in, select a DVR from the list. This loads the DVR in the preview. The video can then be previewed in the browser.
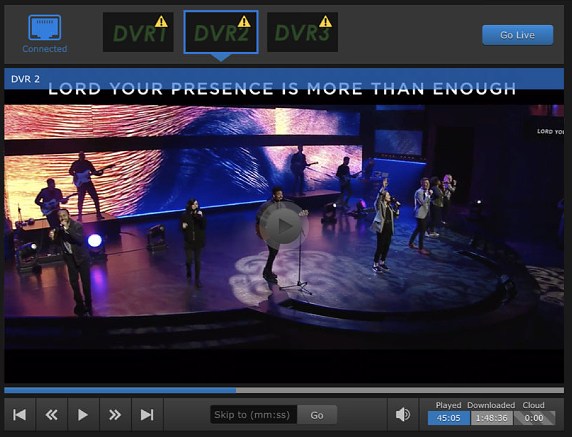
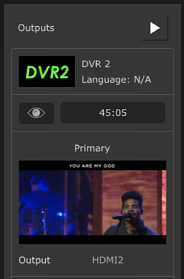
¶ Live Output
Should this method be used, the recommended method is to load the live DVR, go to the end of the feed, using the >| button, and immediately clicking “Go Live.” You can then control the output using the pause/play button.
The downside to this method is that it is not possible to use any transport controls (FF, RW, scrub) in the output. Another method that can be used is by using the video preview, and clicking “Go Live” when the video is at the correct location. However, the output will not always start at the exact location that was used. This is why it is discouraged to use this method in a live environment. If this method is used, it is recommended to use the “Go Live” button about 15-30 seconds before the live point, and then press the pause in the output until ready to go live.
¶ Monitoring
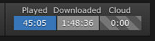
It is recommended to have the web interface in a browser window so that the output can be monitored, even if controlling it via the Stream Deck. In addition, the current video download status can also be monitored using the browser interface. After clicking a DVR, the current played (preview duration), downloaded, and cloud time can be monitored. In a live environment, the “Downloaded” time should be increasing at a consistent rate (ie: 5 seconds every 5 seconds). If the “Cloud” time goes above 10-15 seconds, there may be network issues, which could negatively affect streaming to the device.
¶ Power and Rebooting
¶ Power Down
To shutdown the DE, quickly press the power button located on the front of the device and wait until the status LED shuts off.
Since the DE is a small computer, it is always recommended to shut the device down before cutting power to the device.
¶ Rebooting
If the device is in a permanent location, or does not get freshly powered on weekly, it should be rebooted before being used as a playback device. To reboot the device, go to ☰ → Administration → System Settings → Certificates → Reboot → Confirm. This will take about three minutes.
Older versions of the software may have the reboot menu under a different location,
☰ → Administration → Network → Reboot → Confirm.
¶ Troubleshooting
¶ Audio not working
- If audio is not outputting, try rebooting the DE.
- If the issue persists, try reinserting the video output cable.
- If the issue still persists, verify the signal path as is possible.
- Finally, contact support if the issues cannot be resolved.
¶ Video is glitchy
- Try using the Stream Deck to control the video output vs the web interface.
- Ensure that the video has at least 25 seconds of buffer between what’s playing vs what’s downloaded (example: 01:00:00 played of 01:00:25 downloaded). A shorter buffer will cause problems.
- If the issue persists, try rebooting.
- Finally, contact support if the issues cannot be resolved.
¶ Nothing outputs to the screen
This is a very common issue with this device. Fortunately, it generally goes away after a reboot. However, sometimes it takes multiple reboots.
- We recommend shutting the device down completely using the power button on the front, waiting a few minutes, and starting it back using the power button.
- If that doesn't work, try rebooting using the interface as overviewed in the help above.
- If the device still isn't working after three reboots, please contact production support.
¶ Stream Deck
The DE can also be controlled with the campus Stream Deck. This is the preferred method, since it provides transport controls and gives more status indicators for when a DVR is live. While every setup will look a little different, here is a basic overview of a setup for the DE.
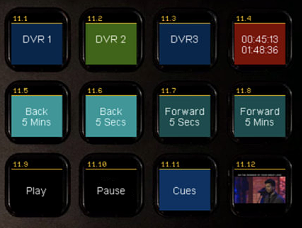
- The top three buttons allow for selecting a DVR. If a DVR is currently live, it will show “Live” underneath to indicate that it is currently live and will be green if it’s currently being played. If the DVR is live when pressed, the output will go to the very end of the DVR video. If not live, it will start at the beginning of the video.
- The fourth button shows how much is played vs how much is currently downloaded.
- The second row of buttons allows for transport using rewind/fast forward by 5 seconds and 5 minutes.
- The final row allows for pausing/playing, setting video cue points, and the latest image of the video output.
All buttons affect live playback and do not allow for video preview like the web interface does. That said, the web interface can be open to view the latest preview of the video.
¶ Video Resources
These are very short video support resources that quickly cover the topics referenced in this article.
- Powering UpHow to turn the DE on, reboot, and shutdown
- Usage OverviewBasics in how to use the DE web interface