This troubleshooting guide assumes that your main PD Rack is wired and fully operational and you've successfully switched your console to the live network. For more information on those processes, see
Load In/Take Down – Hooking Up Power and Lighting Troubleshooting #5 – Transferring Between Visualizer and Live Networks. (where is this?)
¶ Full System Unresponsive
This section is for if no data in the system is functional.
- Load the last known working showfile from Dropbox.
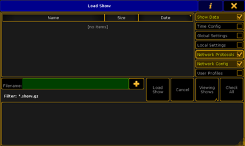
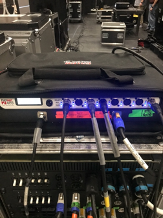
Be sure to load Show Data, Network Protocols, and Network Config. - Ensure that the Pathway Octo (located near the PD Rack) is receiving power. If functioning, the blue power lights on the Octo should be illuminated. If so, move on to step 2.
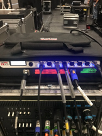
(Octo location may vary by campus)- If these LEDs are not illuminated, ensure that the Octo has been plugged into the PD and that the breaker for the Octo has been energized.
- If the Octo is in a separate case from the PD, ensure that the PowerCon connection on the front of the Octo rack is properly connected.
- Ensure that the PowerCon connection on the back of the Octo is properly seated.
- If available, move the Octo to another open circuit and energize the breaker for that circuit.
- If the campus has a Spare PowerCon cable, replace the cable going to the Octo rack or directly to the Octo. If this resolves the issue, please note in the recap that the spare PowerCon cable was used and mark the bad cable.
- If none of these steps illuminate the green LEDs, call Production Support immediately so that a replacement Octo can be mobilized.
- If the Octo is powering up, but not outputting Data (power lights are illuminated, but Output lights are not and Octo screen says ‘Inactive Output’) (Image 4); there’s likely a problem with the cabling going from the console to the Octo.
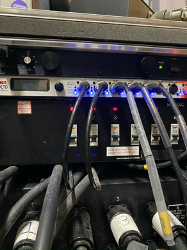
- Ensure that all of the EtherCon or Cat5 connections from the lighting console to the Octo are properly seated. These connections could include all or some of the following: Console, Console Rack Patch Plate, FOH Wall Patch Plate, Backstage Wall Patch Plate, Octo Rack Patch Plate, PD Rack Patch Plate, Back of Octo Unit.
- If the campus has a Spare EtherCon or Cat5 cable, move the Lighting Console or Lighting Console Rack close to the Octo and plug directly into the Octo (bypassing all potential failure points from Front of House to the Octo). If this resolves the issue, there is an issue with the cabling or patch panels in the signal chain.
- If cabling or patch panel problems are found, please call Production Support.
- If connecting the Lighting Console directly to the Octo (bypassing all potential failure points from Front of House to the Octo) doesn’t resolve the problem; there may be an IP address issue.
- The address of Octo units in Church of the Highlands portable campuses should be 10.101.50.xxx (xxx can be replaced with any number from 2 to 255, but is usually 101)(Image 4).
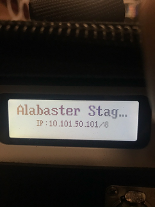
- If the address of the Octo doesn’t fall in the 10.101.50.xxx range, the address needs to be changed.
- From the default display (Image 3), press the encoder knob. The Node Configuration menu will be shown.
- Rotate the knob to scroll to ‘Network Setup’. Push the knob to select.
- The top item in the next menu should be ‘IP Address’. Push the knob to select.
- Rotate the knob to scroll to the correct address for each octet of the IP Address. Press the knob when the octet is correct.
- Once all octets are correct, rotate the knob to the bottom of the display Back. Press the knob to go back to the main display.
- The address of Octo units in Church of the Highlands portable campuses should be 10.101.50.xxx (xxx can be replaced with any number from 2 to 255, but is usually 101)(Image 4).
- If correcting the IP Address of the unit doesn’t resolve the issue, please call Production Support.
- The Output Lights and Power lights will be illuminated on a properly functioning Octo (Image 6). If that is the case and the Octo is still not functioning, call Production Support.
¶ Single Location Unresponsive
This section is for when certain, single locations are unresponsive. For example, a single truss isn't receiving data.
- Load the last known working showfile from Dropbox.

Be sure to load Show Data, Network Protocols, and Network Config. - It’s best practice to do the following steps with the fixtures at 100% intensity with a pan effect running. That way it’s easy to see when data is restored to the fixtures in question.
- Ensure that all 5 Pin DMX connections from the outputs of the Octo are properly seated.
- Ensure that the Data Port on the Octo is set to the correct Universe.
- View the patch from the console to see where the fixtures that are not operating should be patched.
- On MA Consoles – Press Setup (Image 8), Patch and Fixture Schedule (Image 9), The Correct Layer Name (Image 10), and view the patching for that layer. The format in MA is Universe.Address. Fixture #101 (circled in yellow in Image 10) is patched at Universe 1 Address 1.


- Ensure that the fixtures that are not operating are plugged into the properly setup port on the Octo. In the example above in Image 10, the main run to MH6 CT’s should be setup to send out Universe 1.
- If this is not the case, find a port that is setup to send out the correct universe by using the scroll knob on the Octo and reading the display (Image 11).

- If no universe is set to send the correct universe, use the scroll knob to navigate to an open port. Press the scroll knob and then rotate the knob to set the correct universe for that port to output.
- Once setup, use the scroll knob to navigate to Back on the menu of the Octo. Press the scroll knob to return to the main menu.
- Unplug the data output from the first fixture in the data chain. This will vary by truss and by campus, but normally the fixture closest to the PD on each truss is the first fixture in the chain.
- If unplugging this output corrects the issue (meaning the first fixture in the chain begins to receive data), then the data issue is further down the truss.
- If unplugging the output does not correct the issue and the first fixture does not begin to operate, pull the input out of the first fixture in the data chain and move it to the input of the second fixture.
- If this corrects the problem, then the first fixture has a bad data port and must be replaced. Notify Production Support Immediately.
- If this doesn’t correct the problem, there may be a faulty port on the Octo or the data home run cable may be faulty.
- Change to a different port on the Octo (see instructions in letter ii of step 3 above to change the port setup for the Octo).
- If the data home run is found to be faulty, switch to the Spare Data Home Run (if available) or run a new home run (if available). Notify Production Support and enter this information in the recap.
- From this point, plug the output of the first fixture back in and repeat the unplugging process of each fixture’s output all the way down the truss. The data should restore to each fixture in the chain ahead of the output being unplugged.
- If the output does not restore when plugging in an output, there is likely a bad cable or bad port on a fixture.
- Continue searching and swapping with spare cables to find the source of the problem.
- If a bad cable is found, notify Production Support and put that information in the recap.
- If none of these steps correct the problem, please contact Production Support immediately.